Old window tint can turn purple, bubble, peel, or make it harder to see clearly. On a simple side window, the film may come off at home if you work slowly and soften the adhesive first. Rear glass is different: its defroster wires can be damaged during removal, so a professional is the safer choice if film covers those lines.
Important: Do not use a razor blade, metal scraper, or abrasive pad on the inside of rear glass with defroster or antenna wires. Gila’s rear-window film instructions specifically caution against sharp tools on glass with printed electrical wires. If the old film is on your rear windshield, or the defroster lines are already damaged, have an experienced tint shop assess it.
What you need to remove tint from a side window
- A household steamer used according to its instructions
- Clean microfiber towels and a plastic scraper or plastic pick
- A glass-safe adhesive remover labeled for automotive use
- Protective gloves and eye protection
- A plastic drop cloth or towels to protect the door trim
Keep the work area ventilated, protect interior trim, and follow the label on any remover you use. Do not use a knife or metal razor to start the film. If your car has aftermarket electronics, delicate trim, or a window that is difficult to access, ask a professional before beginning.
How to remove window tint from a side window
- Protect the door and interior. Lay towels or a plastic cover along the door panel. Keep liquids away from switches, speakers, and electrical components.
- Warm a small section of film. Use a steamer and follow its safety directions. Hold it a short distance from the glass, keep it moving, and warm one section at a time. Avoid directing steam into the door seals or interior.
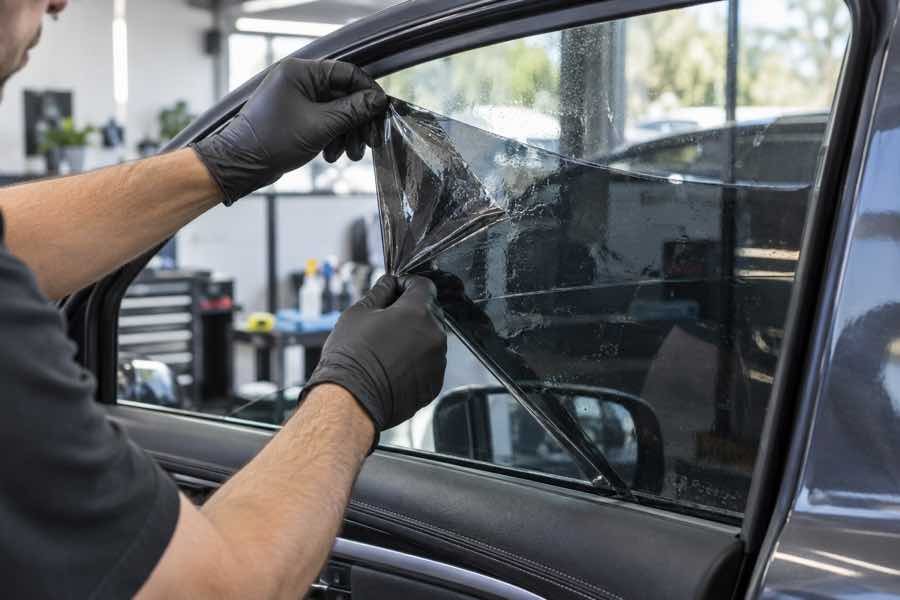
- Lift an accessible corner gently. Try a fingernail or plastic pick at the film edge. If it resists, warm the area again. Do not force a sharp tool between the film and glass.
- Peel slowly while continuing to soften the adhesive. Pull the film back over itself at a low angle. Work in small sections and reapply steam as needed. If the film tears, lift a new edge with the plastic tool and continue patiently.
- Remove remaining adhesive. Apply a glass-safe automotive adhesive remover as directed on its label. Let it work for the stated time, then loosen residue with a plastic scraper and wipe it away. Keep remover off surfaces that the product label says it may damage.
- Clean and inspect the glass. Use an automotive glass cleaner and a clean microfiber towel. Check for remaining adhesive, scratches, and any window mechanism problems before fitting new film.
Why rear window tint is harder to remove
Many rear windows have narrow electrical defroster lines and may also have antenna elements on the glass. These lines can sit on the inside surface. Pulling old film or scraping adhesive can lift or break a line, which may stop part of the defroster from working.
The film’s age, adhesive condition, and the condition of the defroster all affect how difficult removal will be. Even careful removal has risk on some vehicles. Because the cost of damaged rear glass or a failed defroster can outweigh the savings from DIY work, get a quote from a shop before attempting rear-window removal.
The Gila rear-window film instructions warn against sharp tools on the inside surface of glass with printed electrical wires. Those instructions cover film installation, but the caution also shows why metal scraping is a poor choice around defroster lines.
What not to do
- Do not scrape rear defroster lines. Avoid razor blades, metal scrapers, steel wool, and abrasive pads on the inside of wired glass.
- Do not overheat one spot. Excessive or uneven heat may damage trim or stress glass. A steamer or heat source should be used only as its manufacturer directs.
- Do not soak the door. Excess liquid can reach switches, speakers, and other components inside the door.
- Do not mix cleaners or solvents. Use only a product labeled for the surface and follow its directions. Never combine household chemicals.
- Do not rush brittle film. If the film shatters into small pieces or the adhesive stays stubborn, a shop may finish the job with less risk to the glass and interior.
How long does tint removal take?
There is no reliable one-size-fits-all time. A clean, newer side-window film may peel more easily than old, sun-baked film that tears and leaves adhesive behind. Rear windows often take longer because of their wiring and curved shape. Ask a shop for an estimate after they know the vehicle, which windows are involved, and the film’s condition.
Should you remove the tint yourself or hire a shop?
| Situation | DIY may be reasonable | Call a professional |
|---|---|---|
| Side window | Film lifts in large pieces, you can protect the interior, and you have time to work slowly. | Film is brittle, the glass is hard to reach, or you are unsure which cleaners are safe. |
| Rear windshield | Consider DIY only if you have specific experience with wired glass and the film maker’s directions support your method. | Choose a shop when defroster or antenna lines are present, especially if the film is old or already peeling. |
If you plan to work on a side window, you can compare plastic scrapers for automotive glass. Use one only on suitable glass surfaces, follow its instructions, and keep it away from rear-window defroster and antenna lines. Some links in this article are affiliate links. As an Amazon Associate, Window Tint Locator earns from qualifying purchases.
Prefer a pro? Browse the Window Tint Locator listings and ask shops whether they remove old film, how they protect rear-window defrosters, and whether removal is priced separately from new installation.
Leave a Reply
You must be logged in to post a comment.